Combine all ingredients for the vinegar mixture, except lemon juice, in a saucepan. Place it over low heat to dissolve all the sugar and salt. Allow to cool.
Peel and slice lotus root into 1/4 inch thick rings. Soak immediately in water and 1 tablespoon of vinegar to prevent discolouration. Make flower cuts and drain before using.
Boil a pot of water and add the other tablespoon of vinegar. Add sliced lotus root flowers and boil for 5 minutes. Remove lotus root and allow to cool.
Add lotus root slices to vinegar mixture and lemon juice in a resealable bag. Remove any air from the bag, seal and refrigerate for a minimum of 2–3 hours.
They are better on day two after the sweetness and contrasting sourness become more prominent.
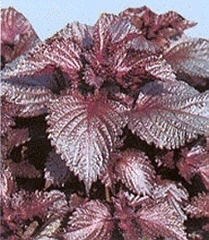
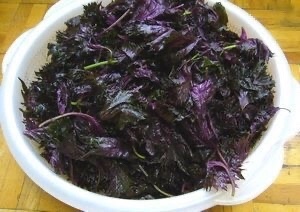
6 tablespoonsfine white sea salt ½ pound red shiso leaves
Spread a layer of salt in the bottom of a small crock. Stack the shiso leaves by 10s and lay the first stack of 10 leaves on top of the salt in the crock. Sprinkle more salt on top of the leaves, just enough so the leaves have a light salt coverage. Alternate leaves and salt until you have placed all of the leaves in the crock. Finish with a last layer of salt to cover the top leaves so none are exposed. Cover with a piece of muslin cloth and weight. Store in a cool, dark place for a couple of weeks to a month.
Bamboo steamers consist of interlocking baskets that stack on top of each other, with a lid on top. The entire setup is placed over a wok or pot of simmering water, and the steam rises through the open ridges at the bottom of each basket, up through the layers to cook whatever’s inside. Steaming, as a cooking method, is as important in Japanese and Asian cuisine in general as baking or roasting is in American or European cooking. A bamboo steamer can steam not just buns and dumplings, but also breads, vegetables, rice, proteins, and cakes and other desserts.
How to use a bamboo steamer:
Fill your wok or pot with water
Place the bamboo steamer into your wok and fill it with enough water to come up above the bottom rim of the steamer by about a quarter inch to half an inch. The water must come up high enough to submerge the bottom rim of the steamer in water and prevent it from scorching.
Line the steamer
If you’re placing food directly on the steamer bed (as is the case with buns or dumplings, for instance), you will need something to line it with to prevent the food from sticking to the bamboo. You can use large, soft napa cabbage leaves, lettuce leaves, layers of cheesecloth, or even squares of parchment paper. When steaming meats, especially with sauces use a heatproof bowl or plate.
Place food in your bamboo steamer
When placing dumplings, buns, etc. in the steamer, do not overcrowd them. Always leave 1 inch between dumplings, and about 1 1/2 inches between larger buns. If you’d like to steam something in a bowl or plate, there is no need to line the steamer. Make sure that there’s enough open space around the bowl or plate to allow the steam to rise up and circulate around the food.
Steaming food
You can place steamer in cooking vessel either over lightly boiling water or over cold water. In general your default is the latter. Once the water in the pot is simmering, it will start to evaporate. Allow the food to steam for as long as the recipe indicates, but keep an eye on it and add boiling water as needed.
Care for your bamboo steamer
To clean your bamboo steamer, wash with a sponge and mild dish soap, immediately rinse thoroughly. Let the steamer air dry for at least 2 days before storing to prevent any mildew. Do not put your bamboo steamer in the dishwasher. Do not soak it in water in the sink for more than 5 minutes.
The makisu is a kind of small bamboo mat made by weaving fine bamboo stems with a cotton string. Makisu is used mainly for the preparation of maki sushi, but also tamagoyaki or to drain the leaves of spinach after cooking.
If you wish to buy these utensils, for your preparations or as a gift, you will find your happiness in the artisans shops of the Kappabashi district in Tokyo.
The makisu mat will allow you to wrap the Maki during preparation. You can also use it to prepare vegetables like spinach or compress tamagoyaki (Japanese omelette) to give it a square shape.
A Hangiri (or sushi oke) is a traditional Japanese wooden tub that is used in the final steps of preparing sushi rice. Its wide flat bottom aids in spreading out the hot rice to help it cool quickly after pouring in the sushi seasoning while simultaneously fanning and mixing the rice with a rice paddle. This helps to give the sushi rice a slightly shiny appearance and speeds up evaporation and absorption so the rice doesn’t get mushy.
A quality one is normally made of uncoated cypress wood or cedar and is bound by two copper bands. They can come in sizes ranging from 1 foot to 3 feet, but for general home use 16 inches in diameter and 4 inches high is ideal. This size is good for 10 to 12 cups of rice.
A goodHangiri can be moderately expensive. One that is around 1 foot should cost about $75.00. The best ones are made out of cypress or cedar, are bound by real copper bands and are made in Japan. If the one you are looking at is less than $50.00 then it is probably a cheap knock-off that is made out of pine with the copper the bands that are actually made of plastic. You will be replacing this one in a year or two at most if you make sushi rice of any kind on a regular basis. The cost of an authentic hangiri is definitely worth the price if you are more than an occasional sushi rice maker.
Seasoning your Hangiri:
Think of seasoning your Hangiri as being similar to seasoning your cast iron skillet; except you use water and rice vinegar instead of bacon grease or lard. It is also necessary if you want to do everything properly and treat it right from the very beginning.
To season, fill it with water and 1/4 cup of rice vinegar and let it sit overnight. The next day pour the water out and dry it well before putting it away.
Before each use:
Fill the hangiri with water and let it sit while your rice cooks or for at least 30 minutes before you plan to use it. Pour out all of the water before putting any hot rice in it. It is probably a good idea to turn it over to drain for a few minutes so there won’t be so much water in it that the rice can soak it up and get mushy.
Since most quality ones are made of untreated cypress, if rice were put in it without first soaking it in water the rice would stick to the wood. The water has a non-stick affect on the wood and also keeps the tub from soaking up too much of the rice vinegar, sugar, and salt mixture. While you’re soaking the tub, do like the pros do and soak your wooden rice paddle and at least one scent free kitchen towel to cover the prepared sushi rice.
After each use, wash and dry your Hangiri thoroughly:
If there is rice stuck to it when you get done, then put warm water in it and let it sit. It is ok to use a sponge or brush to remove stubborn spots, but don’t use any kind of steel or wire brush; it will damage the wood.
After washing, dry thoroughly with a towel and then turn it upside down in a dish drainer or prop it on the side of a bowl to get air flow underneath. If stored while still wet the hangiri may develop mold spots. Don’t dry the tub in the sun, it may warp. If seasoned and cleaned thoroughly after each use, a good quality hangiri will give you many, many years of service.
Rice is an essential food for the Japanese. Rice is not just a side dish, rice is as important as the rest of the meal. More than 300 varieties are grown in Japan, but those that are short-grained and high in starch are preferred. For this exercise we’re preparing four servings.
4 Servings 300 g (12¾ oz), or 2 gou, of Japanese white rice 430 ml (15 fl oz/1¾ cups) water
The gou is a Japanese unit of measurement: 1 gou equals 150 g (5½ oz) of rice or 180 ml (6 fl oz) of water. The amount needed for a bowl of rice for 1 person is 75 g (2¾ oz), or 90 ml (3 fl oz), so 1 gou is the ideal quantity for 2 people. To make this step easier, find a glass that holds 1 gou, you’ll need 11/5 glasses of water for each glass of rice. The weight of rice increases by 2.5 times when cooked, thus 75 g (2¾ oz) rice becomes about 190 g (6¾ oz).
Washing Place the rice in a large bowl. Pour in some water and mix with your hands, then immediately discard the water. Sharpen the rice. This is the Japanese term for removing the excess starch by washing the grains. Cup your hand and plunge your cupped hand into the rice and turn it about 20 times, in small circles. Pour more water into the bowl; it will turn cloudy. Discard this water immediately and “sharpen” the rice again. Pour in some water and discard. Repeat this process 3 to 4 times until the water in the bowl is clear.
Draining Drain the rice in a strainer and let it rest for 30 minutes.
Soaking in water Place the rice in a heavy-based saucepan with a lid, so the rice doesn’t burn. Pour in the required amount of water. Let the rice soak briefly so it absorbs some water before cooking.
Cooking Cover the saucepan and bring to a boil on medium heat. Lower the heat to low and cook for about 12–13 minutes (do not remove the lid after reducing the heat). Take the pan off the heat and let the rice rest for 10 minutes. This ensures that the rice swells up properly. Remove the lid and use a spatula to stir the rice, going right to the bottom of the pan without mashing the grains—if the grains stick, wet the spatula.
Rice Cooker If you want to buy a rice cooker, choose a Japanese model, because Chinese rice cookers are generally designed to cook Chinese rice, which has lower levels of starch and water.
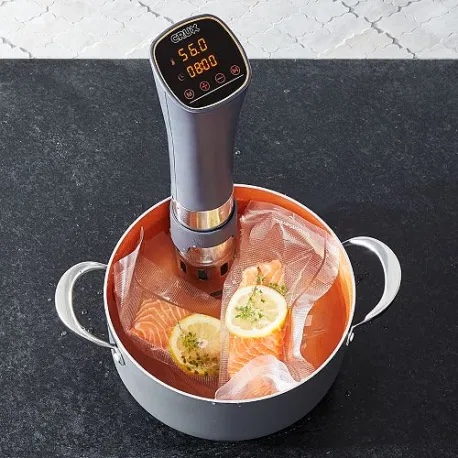
Even If you’re not sure what sous vide exactly is, chances are you’ve tried it whether at that fancy French restaurant you save for special occasions or the egg bites you have with your latte at Starbucks.
A sous vide machine or immersion circulator is used to preheat a water bath to a precise temperature. Food is sealed in plastic bags, though you can also sous vide in glass jars and eggs can be cooked in their shells, and immersed in the bath. The food eventually reaches the same temperature as the water, which is often set to the ideal serving temperature of the final dish.
For meat, poultry, and fish, there is usually a quick searing step before serving. As opposed to conventional stovetop and oven methods, in which the heat used is much higher than the serving temperature of the food, making it imperative to remove the food at just the right moment, when it’s done but not overcooked.
Using sous vide there’s usually no risk of overcooking, making it a tempting technique, especially for temperature-sensitive foods such as fish or steak. The low cooking temperature ensures meat remains juicy; it’s never dry. And dialing in the precise temperature creates exceptionally consistent results that can’t be achieved with traditional methods.
Agar, Agar (Often abbreviated Agar) is derived from red algae or seaweed. Agar is a natural vegetable counterpart to gelatin which is animal based and completely vegetarian. For vegetarians, it makes foods like marshmallows, jelly beans, and gummy bears possibleIt forms rigid, brittle gels. White and semi-translucent, it is sold in packages as washed and dried strips or more commonly in powdered form. It can be used to make jellies, puddings, custards, and aspics.
Agar is the primary ingredient in one of Asia’s new fad diets. Kanten (The Japanese word for Agar, Agar) triples in size and absorbs water, thus you feel fuller.
Kanten Basic Diet
7 Ounces Water
2 Grams Kanten (Agar, Agar)
Fruit or Seasoning (Optional)
Bring water to a simmer and add kanten. Simmer for 2 minutes stirring constantly. Pour into a heat resistant container. Add fruit or seasonings if desired. Cool and allow to set.
Agar, Agar is genrally added to cool liquids and then heated to a boil. The gel sets once it cools to 95° F and must be reheated to 185° before it melts again.
Agar, Agar uses and recipes:
Add to soup as a thickener.
Add to puddings and chill.
Balsamic Vinegar Gel
6.8 Ounces Balsamic Vinegar
2 Grams Agar Agar
Simple Syrup to taste
Bring vinegar to a boil and add Agar Agar. Simmer for 2 minutes. Season to taste with simple syrup. Pour into container and allow to set. Add jelly to a blender and blend until smooth. Strain mixture through a chinois. Pour into a squeeze bottle. Refrigerate until needed.
Balsamic Vinegar Pearls
7 Ounces Balsamic Vinegar
1.5 Grams Agar Agar
1 Cup of Oil
place the oil in a tall glass in the freezer for at least 30 minutes. put the balsamic vinegar in a saucepan, dissolve the agar agar and bring it to the boil, stirring constantly. Take off heat. Wait a few minutes until the temperature drops to 120-130˚ F. Fill a syringe with the hot balsamic agar solution and expel it drop by drop into the cold oil. Wait a few minutes and then carefully remove them from the oil bath using a slotted spoon and rinse them in water. Serve on salads, etc.